Fixing the Microsoft Windows 10 1709 post upgrade restart loop

Fixing the Microsoft Windows 10 1709 post upgrade restart loop

server storage I/O data infrastructure trends

Updated 1/21/2018

Recently I needed to upgrade one of my systems to Microsoft Windows 10 1709 (e.g. the September 2017) release that post upgrade resulted in Windows Explorer, desktop and taskbar going into an endless loop. For those not familiar with Windows 10 1709 learn more here, and here including on how to get the bits (e.g. software). Windows 10 1709 is a semi-annual channel (SAC) Microsoft is following to enable a faster cadence or pace of releases making new features available faster. Note that there is a Windows 10 1709 SAC, as well as Windows Server 2017 SAC (more on that here).

All was well with the 1709 install on Windows 10 until post upgrade when I logged into my account on my laptop (Lenovo X1). Once logged in initially everything looked good until about 10 to 20 seconds later, the screen flickered, the desktop refreshed as did the taskbar. All was well for about another 10 to 20 seconds and again the desktop refreshed as did the taskbar. Trying to use the Windows key plus other keys was no success, likewise trying to use command prompt, Powershell or other tools was futile given how quick the refresh occurred.

Powering off the system and rebooting seemed normal, until once logged in and again the desktop and taskbar reset in the same looping fashion. Once again did a shutdown and restart, logged in and the same result.

The Safe Mode Fix

Unless you can access a command prompt or Powershell with administrator privileges, boot into Windows Safe mode.

The solution to the post Windows 10 1709 upgrade desktop and taskbar restart loop was to boot into safe mode and run the following three commands.

sfc /scannow

dism.exe /online /cleanup-image /scanhealth
dism.exe /online /cleanup-image /restorehealth

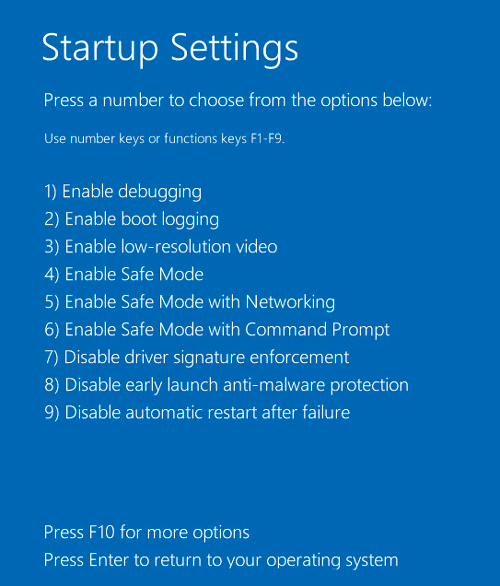
Before you can run the above commands, access Windows Safe Mode. Tip if your Windows 10 system presents a login screen, in the lower right corner select the Shutdown, Restart icon holding down the SHIFT key and select Restart. Your system should reboot presenting you with the following options, selecting Troubleshoot.

Windows 10 Troubleshoot

Next select Advanced options shown below.

Windows 10 Advanced Repair Options

Next select Startup Settings shown below. Note that this sequence of commands are also used for other troubleshooting scenarios including boot problems, restore image or to a previous protection point among other options.

Windows 10 System Repair Options

The following Startup Settings screen appears, select Restart to enter Safe Mode.

Windows 10 Startup Settings

Your system should then present the following options, select Safe Mode with Command Prompt (option 6).

Windows Safe Mode Options

Next your system should display a Command Prompt where the following three commands are run:

sfc /scannow
dism.exe /online /cleanup-image /scanhealth
dism.exe /online /cleanup-image /restorehealth

Windows Command Prompt in safe mode

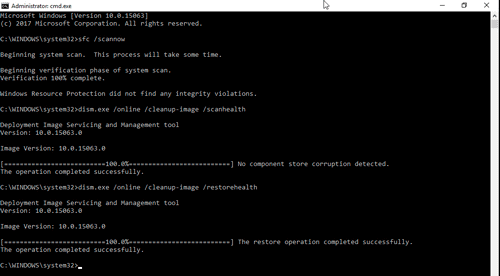
Exit, shutdown, reboot and all should be good.

Some Tips and Recommendations

Before any upgrade, make sure you have good backups to enable various recovery points if needed.

If you have not done so recently, make sure you have system restore enabled, as well as underlying hypervisors or storage system snapshot.

If you have bitlocker enabled, before you do any upgrade, make sure to have a copy of your keys handy if you need to use them.

If you rely on PIN or fingerprint for login, make sure you have your real password handy.

If you have not done so recently, make sure your secondary standby emergency access account is working, if you dont have one, create one.

Where To Learn More

Learn more about related technology, trends, tools, techniques, and tips with the following links.

Additional learning experiences along with common questions (and answers), as well as tips can be found in Software Defined Data Infrastructure Essentials book.

Software Defined Data Infrastructure Essentials Book SDDC

What This All Means

For those who are planning on upgrading to Windows 10 1709 or any system for that matter, being ready for the unexpected can help when the unexpected does occur. While the above is focused on Windows 10 1709 upgrade, the tips and tools including safe mode are used for many other situations. Keep in mind that if something can go wrong sometime, sometime it will go wrong, so be prepared. As for Microsoft Windows 10 1709 post upgrade, all is good and it is running well on my different systems including physical as well as virtual devices.

By the way, if you have not heard, its Blogtober, check out some of the other blogs and posts occurring during October here.

Ok, nuff said, for now.

Gs

Greg Schulz – Microsoft MVP Cloud and Data Center Management, VMware vExpert 2010-2017 (vSAN and vCloud). Author of Software Defined Data Infrastructure Essentials (CRC Press), as well as Cloud and Virtual Data Storage Networking (CRC Press), The Green and Virtual Data Center (CRC Press), Resilient Storage Networks (Elsevier) and twitter @storageio. Courteous comments are welcome for consideration. First published on https://storageioblog.com any reproduction in whole, in part, with changes to content, without source attribution under title or without permission is forbidden.

All Comments, (C) and (TM) belong to their owners/posters, Other content (C) Copyright 2006-2024 Server StorageIO and UnlimitedIO. All Rights Reserved. StorageIO is a registered Trade Mark (TM) of Server StorageIO.

Supermicro CSE-M14TQC Use your media bay to add 12 Gbps SAS SSD drives to your server

Storage I/O trends

Supermicro CSE-M14TQC Use your media bay to add 12 Gbps SAS SSD drives to your server

Do you have a computer server, workstation or mini-tower PC that needs to have more 2.5" form factor hard disk drive (HDD), solid state device (SSD) or hybrid flash drives added yet no expansion space?

Do you also want or need the HDD or SSD drive expansion slots to be hot swappable, 6 Gbps SATA3 along with up to 12 Gbps SAS devices?

Do you have an available 5.25" media bay slot (e.g. where you can add an optional CD or DVD drive) or can you remove your existing CD or DVD drive using USB for software loading?

Do you need to carry out the above without swapping out your existing server or workstation on a reasonable budget, say around $100 USD plus tax, handling, shipping (your prices may vary)?

If you need implement the above, then here is a possible solution, or in my case, an real solution.

Via StorageIOblog Supermicro 4 x 2.5 12Gbps SAS enclosure CSE-M14TQC
Supermicro CSE-M14TQC with hot swap canister before installing in one of my servers

In the past I have used a solution from Startech that supports up to 4 x 2.5" 6 Gbps SAS and SATA drives in a 5.25" media bay form factor installing these in my various HP, Dell and Lenovo servers to increase internal storage bays (slots).

Via Amazon.com StarTech SAS and SATA expansion
Via Amazon.com StarTech 4 x 2.5" SAS and SATA internal enclosure

I still use the StarTech device shown (read earlier reviews and experiences here, here and here) above in some of my servers which continue to be great for 6Gbps SAS and SATA 2.5" HDDs and SSDs. However for 12 Gbps SAS devices, I have used other approaches including external 12 Gbps SAS enclosures.

Recently while talking with the folks over at Servers Direct, I mentioned how I was using StarTech 4 x 2.5" 6Gbps SAS/SATA media bay enclosure as a means of boosting the number of internal drives that could be put into some smaller servers. The Servers Direct folks told me about the Supermicro CSE-M14TQC which after doing some research, I decided to buy one to complement the StarTech 6Gbps enclosures, as well as external 12 Gbps SAS enclosures or other internal options.

What is the Supermicro CSE-M14TQC?

The CSE-M14TQC is a 5.25" form factor enclosure that enables four (4) 2.5" hot swappable (if your adapter and OS supports hot swap) 12 Gbps SAS or 6 Gbps SATA devices (HDD and SSD) to fit into the media bay slot normally used by CD/DVD devices in servers or workstations. There is a single Molex male power connector on the rear of the enclosure that can be used to attach to your servers available power using applicable connector adapters. In addition there are four seperate drive connectors (e.g. SATA type connectors) that support up to 12 Gbps SAS per drive which you can attach to your servers motherboard (note SAS devices need a SAS controller), HBA or RAID adapters internal ports.

Cooling is provided via a rear mounted 12,500 RPM 16 cubic feet per minute fan, each of the four drives are hot swappable (requires operating system or hypervisor support) contained in a small canister (provided with the enclosure). Drives easily mount to the canister via screws that are also supplied as part of the enclosure kit. There is also a drive activity and failure notification LED for the devices. If you do not have any available SAS or SATA ports on your servers motherboard, you can use an available PCIe slot and add a HBA or RAID card for attaching the CSE-M14TQC to the drives. For example, a 12 Gbps SAS (6 Gbps SATA) Avago/LSI RAID card, or a 6 Gbps SAS/SATA RAID card.

Via Supermicro CSE-M14TQC rear details (4 x SATA and 1 Molex power connector)

Via StorageIOblog Supermicro 4 x 2.5 rear view CSE-M14TQC 12Gbps SAS enclosure
CSE-M14TQCrear view before installation

Via StorageIOblog Supermicro CSE-M14TQC 12Gbps SAS enclosure cabling
CSE-M14TQC ready for installation with 4 x SATA (12 Gbps SAS) drive connectors and Molex power connector

Tip: In the case of the Lenovo TS140 that I initially installed the CSE-M14TQC into, there is not a lot of space for installing the drive connectors or Molex power connector to the enclosure. Instead, attach the cables to the CSE-M14TQC as shown above before installing the enclosure into the media bay slot. Simply attach the connectors as shown and feed them through the media bay opening as you install the CSE-M14TQC enclosure. Then attach the drive connectors to your HBA, RAID card or server motherboard and the power connector to your power source inside the server.

Note and disclaimer, pay attention to your server manufactures power loading and specification along with how much power will be used by the HDD or SSD’s to be installed to avoid electrical power or fire issues due to overloading!

Via StorageIOblog Supermicro CSE-M14TQC enclosure Lenovo TS140
CSE-M14TQC installed into Lenovo TS140 empty media bay

Via StorageIOblog Supermicro CSE-M14TQC drive enclosure Lenovo TS140

CSE-M14TQC installed with front face plated installed on Lenovo TS140

Where to read, watch and learn more

Storage I/O trends

What this all means and wrap up

If you have a server that simply needs some extra storage capacity by adding some 2.5" HDDs, or boosting performance with fast SSDs yet do not have any more internal drive slots or expansion bays, leverage your media bay. This applies to smaller environments where you might have one or two servers, as well as for environments where you want or need to create a scale out software defined storage or hyper-converged platform using your own hardware. Another option is that if you have a lab or test environment for VMware vSphere ESXi Windows, Linux, Openstack or other things, this can be a cost-effective approach to adding both storage space capacity as well as performance and leveraging newer 12Gbps SAS technologies.

For example, create a VMware VSAN cluster using smaller servers such as Lenovo TS140 or equivalent where you can install a couple of 6TB or 8TB higher capacity 3.5" drive in the internal drive bays, then adding a couple of 12 Gbps SAS SSDs along with a couple of 2.5" 2TB (or larger) HDDs along with a RAID card, and high-speed networking card. If VMware VSAN is not your thing, how about setting up a Windows Server 2012 R2 failover cluster including Scale Out File Server (SOFS) with Hyper-V, or perhaps OpenStack or one of many other virtual storage appliances (VSA) or software defined storage, networking or other solutions. Perhaps you need to deploy more storage for a big data Hadoop based analytics system, or cloud or object storage solution? On the other hand, if you simply need to add some storage to your storage or media or gaming server or general purpose server, the CSE-M14TQC can be an option along with other external solutions.

Ok, nuff said

Cheers
Gs

Greg Schulz – Author Cloud and Virtual Data Storage Networking (CRC Press), The Green and Virtual Data Center (CRC Press) and Resilient Storage Networks (Elsevier)
twitter @storageio

All Comments, (C) and (TM) belong to their owners/posters, Other content (C) Copyright 2006-2024 Server StorageIO and UnlimitedIO LLC All Rights Reserved

Upgrading Lenovo X1 Windows 7 with a Samsung 840 SSD

Storage I/O trends

I recently upgraded my Lenovo X1 laptop from a Samsung 830 256GB Solid State Device (SSD) drive to a new Samsung 840 512GB SSD. The following are some perspectives, comments on my experience in using the Samsung SSD over the past year, along with what was involved in the upgrade.

Background

A little over a year ago I upgraded my then new Lenovo X1 replacing upon its arrival the factory supplied Hard Disk Drive (HDD) with a Solid State Device (SSD) drive. After setup and data migration the 2.5” 7,200 RPM 320GB Toshiba HDD was cloned to a SATA 256GB Samsung model 830 SSD. By first setting up and configuring, copying files, applications, going through Windows and other updates, when it came time to clone to the SSD, the HDD effectively became a backup.

Note that prior to using the Samsung SSD in my Lenovo X1, I was using Hybrid HDD (HHDD’s) as my primary storage to boost read performance and space capacity. These were in addition to other external SSD and HDD that I used along with NAS devices. Read more about my HHDD experiences in a series of post here.

Fast forward to the present and it is time to do yet another upgrade, not because there is anything wrong with the Samsung SSD other than I was running low on space capacity. Sure 256GB was a lot of space, however I also had become used to having a 500GB and 750GB HHDD before downsizing to the SSD. Granted some of the data I have on the SSD is more for convenience, as a cache or buffer when not connected to the network. Not to mention if you have VMware Workstation for running various Virtual Machines (VMs) you know how those VMs can add up quickly, not to mention videos and other items.

Stack of HDD, HHDD and SSDs

Over the past year, my return on investment (ROI) and return on innovation (the new ROI) was as low as three months, or worse case about six months. That was based on the amount of time I was able to not have to wait while saving data. Sure, I had some read and boot performance improvements, as well as being able to do more IOPs and other things. However those were not as significant due to having been using HHDDs vs. if had gone from HDD to SSD.

My productivity was saving 3 to 5 minutes per day when storing large files, documents, videos or other items as part of generating or working on content. Not to mention seeing faster snapshots and other copy functions for HA, BC, DR take less time enabling more productivity to occur vs. waiting.

Thus the ROI timeframe varies depends on what I value my time on or for a particular project among other things.

Sure IOPS are important, so to is simple wall clock or stop watch based timing to measure work being done or time spent waiting.

Upgrade Time

While this was replacing one SSD with another, the same things and steps would apply if going from an HDD to SSD.

Before upgrade
Free space and storage utilization before the upgrade

Make sure that you have a good full and consistent backup copy of your data.

If it is enabled, disable bit locker or other items that might interfere with the clone. Here is a post if you are interested in enabling Windows bitlocker on Windows 7 64 bit.

Run a quick cleanup, registry repair or other maintenance to make sure you have a good and consistent copy before cloning it.

Install any migration or clone software, in the past I have used Seagate Discwizard (Acronis) along with full Acronis in the past. This time I used the Samsung Data Migration powered by Clonix, which is an improvement IMHO vs. what they used to supply which was Norton Ghost.

Shutdown Time

Attach the new drive, for this upgrade I removed the existing Samsung 830 SSD from its internal bay and replaced it with the new Samsung 840. The Samsung 830 was then attached to Lenovo X1 laptop using a USB to SATA cable. Note that you could also do the opposite which is attach the new drive using the USB to SATA cable for the clone operation, then install that into the internal drive bay which would drop need for changing boot sequence.


Samsung 830, Samsung 840 and Lenovo X1


Old Samsung 830 removed, new 840 being installed


Samsung 840 goes in Lenovo X1, Samsung 830 with SATA to USB cable

Since I removed the old drive and attached that to the Lenovo X1 via a SATA to USB cable, and the new drive internal, I also had to change the boot sequence. Remember to change this boot sequence back after the upgrade is complete. On the other hand, if you leave the original drive internally and attach the new drive via a USB to SATA, or eSATA to SATA cable for the clone, you do not need to change the boot sequence.


Changing boot sequence , note one SSDs appears as USB cable being used

Before running the data migration software, I disabled my network connection to make sure the system was isolated during the upgraded and then run the data migration software tool.


Samsung Data Migration tool (powered by Clonix Ltd.) during clone operation

Unlike tools such as Seagate DiscWizard based on Acronis, the Samsung tool based on Clonix does not shutdown or performs upgrade off-line. There is a tradeoff here that I observed, the Acronis shutdown approach while being offline, seemed quicker, however that is subjective. The Samsung tool seemed longer, about 2.5 hours to clone 256G to 512G however, I was still able to do things on the PC (making screen shots).

Even though the Clonix powered Samsung data migration tool works on-line enabling things to be done, best to leave all applications shutdown.

Once the data migration tool is done and it says 100 percent complete DO NOT DO ANYTHING until you see a prompt telling you to do something.

WAIT, as there is some background things that occur after you get the 100 percent complete. When you see prompt screen, only then it will be ok to move forward.

At that point, shutdown window, remove old drive, change any setup boot sequence and reboot to verify all is ok.

Also, remember to turn bit locker back on if needed.

Post Mortem

How is the new SSD drive is running?

So far so good, as fast if not better than the old one.


About a month after the upgrade and the space is being put to use.

How about the Samsung 830?

That is now being used for various things in my test lab environment joining other SSD, HHDD and HDDs supporting various physical and virtual server activities including in some testing as part of this series (watch for more in this series soon).

Ok, nuff said.

Cheers gs

Greg Schulz – Author Cloud and Virtual Data Storage Networking (CRC Press), The Green and Virtual Data Center (CRC Press) and Resilient Storage Networks (Elsevier)
twitter @storageio

All Comments, (C) and (TM) belong to their owners/posters, Other content (C) Copyright 2006-2024 Server StorageIO and UnlimitedIO LLC All Rights Reserved

Data Migration Tips

Storage I/O trends

Data migration and movement, whether to support technology upgrades or replacements, tiered storage, ILM, consolidation, BC/DR and load balancing among other things is something that most if not all IT environments do at some point in time. Some organizations based on size or other criteria may be more involved with data migration on a more routine basis using host software, appliances or migration tools, storage system as well as migration services.

Robert (Bob) Scheier has a new article over on SearchStorage about Eight data migration tips” that provides a good basis or starting point for learning more about issues, options and general items to consider with regard to data movement and migration. Read more what Robert and those he talks with including me in his new article here.

Ok, nuff said.

Cheers gs

Greg Schulz – Author Cloud and Virtual Data Storage Networking (CRC Press), The Green and Virtual Data Center (CRC Press) and Resilient Storage Networks (Elsevier)
twitter @storageio

All Comments, (C) and (TM) belong to their owners/posters, Other content (C) Copyright 2006-2024 Server StorageIO and UnlimitedIO LLC All Rights Reserved