Introducing Windows Subsystem for Linux WSL Overview #blogtober

Updated 1/21/2018
Introducing Windows Subsystem for Linux WSL and Overview. Microsoft has been increasing their support of Linux across Azure public cloud, Hyper-V and Linux Integration Services (LIS) and Windows platforms including Windows Subsystem for Linux (WSL) as well as Server along with Docker support.

WSL with Ubuntu installed and open in a window on one of my Windows 10 systems.
WSL is not a virtual machine (VM) running on Windows or Hyper-V, rather it is a subsystem that coexists next to win32 (read more about how it works and features, enhancements here). Once installed, WSL enables use of Linux bash shell along with familiar tools (find, grep, sed, awk, rsync among others) as well as services such as ssh, MySQL among others.
What this all means is that if you work with both Windows and Linux, you can do so on the same desktop, laptop, server or system using your preferred commands. For example in one window you can be using Powershell or traditional Windows commands and tools, while in another window working with grep, find and other tools eliminating the need to install things such as wingrep among others.
Installing WSL
Depending on which release of Windows desktop or server you are running, there are a couple of different install paths. Since my Windows 10 is the most recent release (e.g. 1709) I was able to simply go to the Microsoft Windows Store via desktop, search for Windows Linux, select the distribution, install and launch. Microsoft has some useful information for installing WSL on different Windows version here, as well as for Windows Servers here.

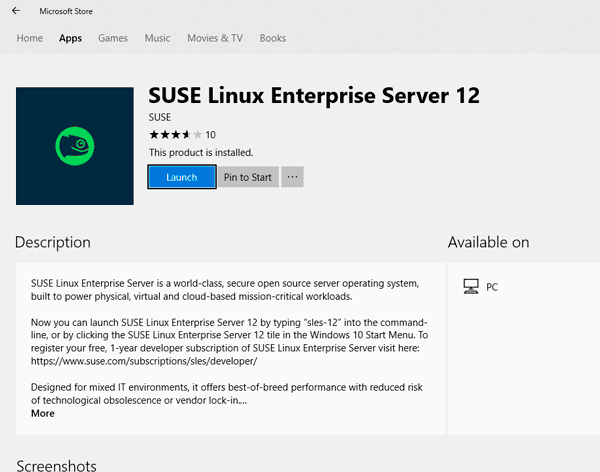
Get WSL from Windows Store or more information and options here.

Click on Get the app

Select desired WSL distribution

Lests select SUSE as I already have Ubuntu installed (I have both)

SUSE WSL in the process of downloading. Note SUSE needs an access code (free) that you get from https://www.suse.com/subscriptions/sles/developer/ while waiting for the download and install is a good time to get that code.
Launching WSL with SUSE, you will be prompted to enter the code mentioned above, if you do not have a code, get it here from SUSE.

The WSL installation is very straight forward, enter the SUSE code (Ubuntu did not need a code). Note the Ubuntu and SUSE WSL task bar icons circled bottom center.
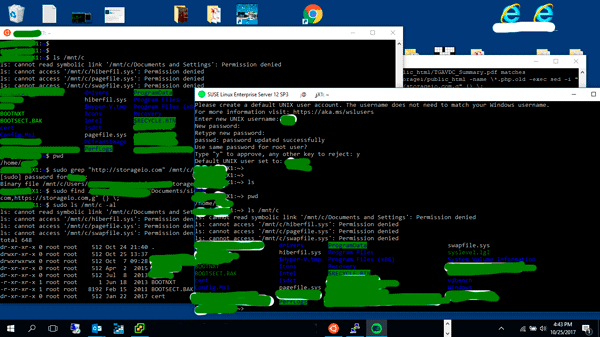
Provide a username for accessing the WSL bash shell along with password, confirm how root and sudo to be applied and that is it. Serious, the install for WSL at least with Windows 10 1709 is that fast and easy. Note in the above image, I have WSL with Ubuntu open in a window on the left, WSL with SUSE on the right, and their taskbar icons bottom center.
Enable Windows Subsystem for Linux Feature on Windows
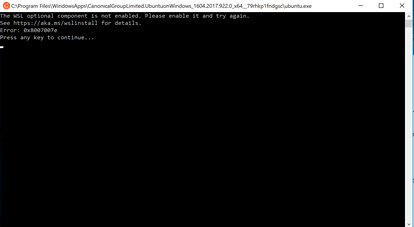
If you get the above WSL error message 0x8007007e when installing WSL Ubuntu, SUSE or other shell distro, make sure to enable the Windows WSL feature if not already installed.
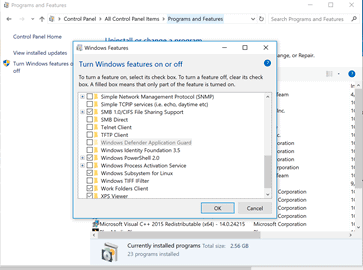
One option is to install additional Windows features via settings or control panel. For example, Control panel -> Programs and features -> Turn Windows features on or off -> Check the box for Windows Subsystem for Linux
Another option is to install Windows subsystem feature via Powershell for example.
enable-windowsoptionalfeature -online -featurename microsoft-windows-subsystem-linux
Using WSL
Once you have WSL installed, try something simple such as view your present directory:
pwd
Then look at the Windows C: drive location
ls /mnt/c -al
In case you did not notice the above, you can use Windows files and folders from the bash shell by placing /mnt in front of the device path. Note that you need to be case-sensitive such as User vs. user or Documents vs. documents.
As a further example, I needed to change several .htm, .html, .php and .xml files on a Windows system whose contents had not yet changed from https://storageio.com to https://storageio.com. Instead of installing wingrep or some tools, using WSL such as with Ubuntu finding files can be done with grep such as:
grep "https://storageio.com" /mnt/c/Users/*.xml
And then making changes using find and sed such as:
find /mnt/c/Users -name \*.xml -exec sed -i "s,https://storageio.com,https://storageio.com,g" {} \;Note that not all Linux apps and tools can use file via /mnt in which case a solution is to create a symbolic link.
For example:
ln -s "/mnt/c/Users/Test1/Documents" /home/Test1/Projects
Where To Learn More
Learn more about related technology, trends, tools, techniques, and tips with the following links.
- Cloud Conversations Azure AWS Service Maps via Microsoft
- Microsoft Azure September 2017 Software Defined Data Infrastructure Updates
- Azure Software Defined Data Infrastructure Architecture Resources
- New family of Intel Xeon Scalable Processors enable software defined data infrastructures (SDDI) and SDDC
- Microsoft Windows Server, Azure, Nano Life cycle Updates
- Overview Review of Microsoft ReFS (Reliable File System) and resource links
- General WSL information (Via MSDN)
- WSL FAQs (Via MSDN) and reference material (Via MSDN)
- Installing WSL on Windows 10 systems (Via MSDN) and on a Windows Server (Via MSDN)
- What about powershell, bash and Windows (Via Microsoft Blogs)
- WSL features, enhancements and other notes (Via Microsoft Blogs)
- Fixing the Microsoft Windows 10 1709 post upgrade restart loop
- Software Defined Data Infrastructure Essentials (CRC Press) book companion page
Additional learning experiences along with common questions (and answers), as well as tips can be found in Software Defined Data Infrastructure Essentials book.

What This All Means
If you primarily work on (or have a preference for) Linux systems and need to do some functions from development to the administration or other activity on a Windows system, Windows Subsystem for Linux (WSL) provides a bash shell to do familiar tasks. Likewise, if you are primarily a Windows person and need to brush up on your Linux skills, WSL can help. If you need to run Linux server applications or workloads, put those into a Docker container, Hyper-V instance or Azure VM.
Overall I like WSL for what it is, a tool that eliminates the need of having to install several other tools to do common tasks, plus makes it easier to work across various Linux and Windows systems including bare metal, virtual and cloud-based. Now that you have been introduced to Windows Subsystems for Linux WSL and an overview including install as well as using, add it to your data infrastructure toolbox.
By the way, if you have not heard, its #Blogtober, check out some of the other blogs and posts occurring during October here.
Ok, nuff said, for now.
Gs
Greg Schulz – Microsoft MVP Cloud and Data Center Management, VMware vExpert 2010-2017 (vSAN and vCloud). Author of Software Defined Data Infrastructure Essentials (CRC Press), as well as Cloud and Virtual Data Storage Networking (CRC Press), The Green and Virtual Data Center (CRC Press), Resilient Storage Networks (Elsevier) and twitter @storageio. Courteous comments are welcome for consideration. First published on https://storageioblog.com any reproduction in whole, in part, with changes to content, without source attribution under title or without permission is forbidden.
All Comments, (C) and (TM) belong to their owners/posters, Other content (C) Copyright 2006-2026 Server StorageIO and UnlimitedIO. All Rights Reserved. StorageIO is a registered Trade Mark (TM) of Server StorageIO.