Part II Revisting AWS S3 Storage Gateway (Test Drive Deployment)

server storage I/O trends

Part II Revisiting AWS S3 Storage Gateway (Test Drive Deployment)

This Amazon Web Service (AWS) Storage Gateway Revisited posts is a follow-up to the AWS Storage Gateway test drive and review I did a few years ago (thus why it’s called revisited). As part of a two-part series, the first post looks at what AWS Storage Gateway is, how it has improved since my last review of AWS Storage Gateway along with deployment options. The second post in the series looks at a sample test drive deployment and use.

What About Storage Gateway Costs?

Costs vary by region, type of storage being used (files stored in S3, Volume Storage, EBS Snapshots, Virtual Tape storage, Virtual Tape storage archive), as well as type of gateway host, along with how access and used. Request pricing varies including data written to AWS storage by gateway (up to maximum of $125.00 per month), snapshot/volume delete, virtual tape delete, (prorate fee for deletes within 90 days of being archived), virtual tape archival, virtual tape retrieval. Note that there are also various data transfer fees that also vary by region and gateway host. Learn more about pricing here.

What Are Some Storage Gateway Alternatives

AWS and S3 storage gateway access alternatives include those from various third-party (including that are in the AWS marketplace), as well as via data protection tools (e.g. backup/restore, archive, snapshot, replication) and more commonly storage systems. Some tools include Cloudberry, S3FS, S3 motion, S3 Browser among many others.

Tip is when a vendor says they support S3, ask them if that is for their back-end (e.g. they can access and store data in S3), or front-end (e.g. they can be accessed by applications that speak S3 API). Also explore what format the application, tool or storage system stores data in AWS storage, for example, are files mapped one to one to S3 objects along with corresponding directory hierarchy, or are they stored in a save set or other entity.

AWS Storage Gateway Deployment and Management Tips

Once you have created your AWS account (if you did not already have one) and logging into the AWS console (note the link defaults to US East 1 Region), go to the AWS Services Dashboard and select Storage Gateway (or click here which goes to US East 1). You will be presented with three options (File, Volume or VTL) modes.

What Does Storage Gateway and Install Look Like

The following is what installing a AWS Storage Gateway for file and then volume looks like. First, access the AWS Storage Gateway main landing page (it might change by time you read this) to get started. Scroll down and click on the Get Started with AWS Storage Gateway button or click here.

AWS Storage Gateway Landing Page

Select type of gateway to create, in the following example File is chosen.

Select type of AWS storage gateway

Next select the type of file gateway host (EC2 cloud hosted, or on-premises VMware). If you choose VMware, an OVA will be downloaded (follow the onscreen instructions) that you deploy on your ESXi system or with vCenter. Note that there is a different VMware VM gateway OAV for File Gateway and another for Volume Gateway. In the following example VMware ESXi OVA is selected and downloaded, then accessed via VMware tools such as vSphere Web Client for deployment.

AWS Storage Gateway select download

Once your VMware OVA file is downloaded from AWS, install using your preferred VMware tool, in this case I used the vSphere Web Client.

AWS Storage Gateway VM deploy

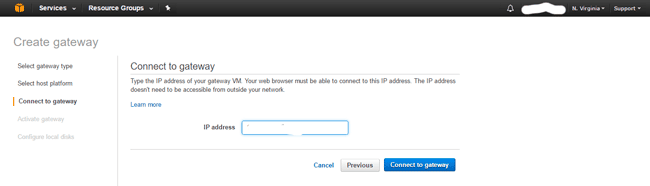
Once you have deployed the VMware VM for File Storage Gateway, it is time to connect to the gateway using the IP address assigned (static or DHCP) for the VM. Note that you may need to allocate some extra VMware storage to the VM if prompted (this mainly applies to Volume Gateway). Also follow directions about setting NTP time, using paravirtual adapters, thick vs. thin provisioning along with IP settings. Also double-check to make sure your VM and host are set for high-performance power setting. Note that the default username is sguser and password is sgpassword for the gateway.

AWS Storage Gateway Connect

Once you successfully connect to the gateway, next step will be to configure file share settings.

AWS Storage Gateway Configure File Share

Configure file share by selecting which gateway to use (in case you have more than one), name of an S3 bucket name to create, type of storage (S3 Standard or IA), along with Access Management security controls.

AWS Storage Gateway Create Share

Next step is to complete file share creation, not the commands provided for Linux and Windows for accessing the file share.

AWS Storage Gateway Review Share Settings

Review file share settings

AWS Storage Gateway access from Windows

Now lets use the file share by accessing and mounting to a Windows system, then copy some files to the file share.

AWS Storage Gateway verify Bucket Items

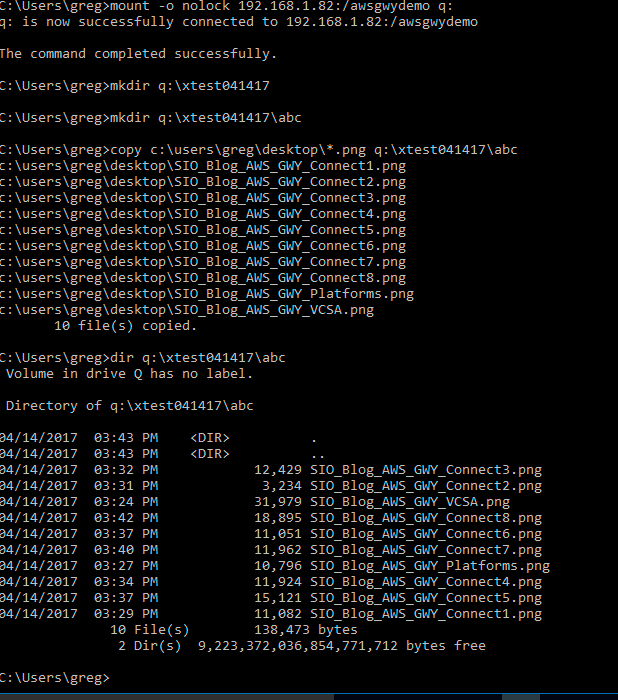
Now let’s go to the AWS console (or in our example use S3 Browser or your favorite tool) and look at the S3 bucket for the file share and see what is there. Note that each file is an object, and the objects simply appear as a file. If there were sub-directory those would also exist. Note that there are other buckets that I have masked out as we are only interested in the one named awsgwydemo that is configured using S3 Standard storage.

AWS Storage Gateway Volume

Now lets look at using the S3 Storage Gateway for Volumes. Similar to deploying for File Gateway, start out at the AWS Storage Gateway page and select Volume Gateway, then select what type of host (EC2 cloud, VMware or Hyper-V (2008 R2 or 2012) for on-premises deployment). Lets use the VMware Gateway, however as mentioned above, this is a different OVA/OVF than the File Gateway.

AWS Storage Gateway Configure Volume

Download the VMware OVA/OVF from AWS, and then install using your preferred VMware tools making sure to configure the gateway per instructions. Note that the Volume Gateway needs a couple of storage devices allocated to it. This means you will need to make sure that a SCSI adapter exists (or add one) to the VM, along with the disks (HDD or SSD) for local storage. Refer to AWS documentation about how to size, for my deployment I added a couple of small 80GB drives (you can choose to put on HDD or SSD including NVMe). Note that when connecting to the gateway if you get an error similar to below, make sure that you are in fact using the Volume Gateway and not mistakenly using the File Gateway OVA (VM). Note that the default username is sguser and password is sgpassword for the gateway.

AWS Storage Gateway Connect To Volume

Now connect to the local Volume Storage Gateway and notice the two local disks allocated to it.

AWS Storage Gateway Cached Volume Deploy

Next its time to create the Gateway which are deploying a Volume Cached below.

AWS Storage Gateway Volume Create

Next up is creating a volume, along with its security and access information.

AWS Storage Gateway Volume Settings

Volume configuration continued.

AWS Storage Gateway Volume CHAP

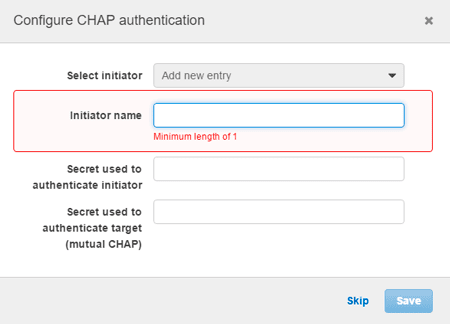
And now some additional configuration of the volume including iSCSI CHAP security.

AWS Storage Gateway Windows Access

Which leads us up to some Windows related volume access and configuration.

AWS Storage Gateway Using iSCSI Volume

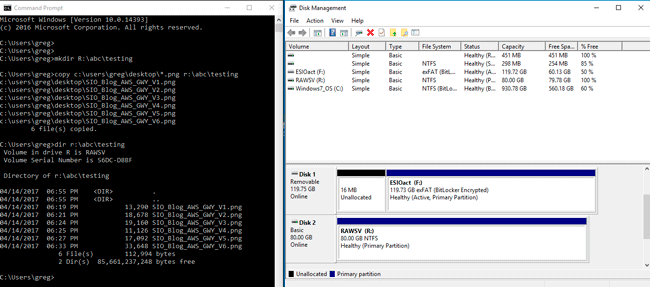
Now lets use the new iSCSI based AWS Storage Gateway Volume. On the left you can see various WIndows command line activity, along with corresponding configuration information on the right.

AWS Storage Gateway Being Used by Windows

And there you have it, a quick tour of AWS Storage Gateway, granted there are more options that you can try yourself.

AWS

Where To Learn More

What This All Means

Overall I like the improvements that AWS has made to the Storage Gateway along with the different options it provides. Something to keep in mind is that if you are planning to use the AWS Storage Gateway File serving sharing mode that there are caveats to multiple concurrent writers to the same bucket. I would not be surprised if some other gateway or software based tool vendors tried to throw some fud towards the Storage Gateway, however ask them then how they coordinate multiple concurrent updates to a bucket while preserving data integrity.

Which Storage Gateway variant from AWS to use (e.g. File, Volume, VTL) depends on what your needs are, same with where the gateway is placed (Cloud hosted or on-premises with VMware or Hyper-V). Keep an eye on your costs, and more than just the storage space capacity. This means pay attention to your access and requests fees, as well as different service levels, along with data transfer fees.

You might wonder what about EFS and why you would want to use AWS Storage Gateway? Good question, at the time of this post EFS has evolved from being internal (e.g. within AWS and across regions) to having an external facing end-point however there is a catch. That catch which might have changed by time you read this is that the end-point can only be accessed from AWS Direct Connect locations.

This means that if your servers are not in a AWS Direct Connect location, without some creative configuration, EFS is not an option. Thus Storage Gateway File mode might be an option in place of EFS as well as using AWS storage access tools from others. For example I have some of my S3 buckets mounted on Linux systems using S3FS for doing rsync or other operations from local to cloud. In addition to S3FS, I also have various backup tools that place data into S3 buckets for backup, BC and DR as well as archiving.

Check out AWS Storage Gateway yourself and see what it can do or if it is a fit for your environment.

Ok, nuff said (for now…).

Cheers
Gs

Greg Schulz – Multi-year Microsoft MVP Cloud and Data Center Management, VMware vExpert (and vSAN). Author Cloud and Virtual Data Storage Networking (CRC Press), The Green and Virtual Data Center (CRC Press), Resilient Storage Networks (Elsevier) and twitter @storageio. Watch for the spring 2017 release of his new book "Software-Defined Data Infrastructure Essentials" (CRC Press).

Courteous comments are welcome for consideration. First published on https://storageioblog.com any reproduction in whole, in part, with changes to content, without source attribution under title or without permission is forbidden.

All Comments, (C) and (TM) belong to their owners/posters, Other content (C) Copyright 2006-2023 Server StorageIO(R) and UnlimitedIO. All Rights Reserved.

Azure Stack TP3 Overview Preview Review Part II

server storage I/O trends

Azure Stack TP3 Overview Preview (Part II) Install Review

This is part two of a two-part series looking at Microsoft Azure Stack with a focus on my experiences installing Microsoft Azure Stack Technical Preview 3 (TP3) including into a nested VMware vSphere ESXi environment. Read part one here that provides a general overview of Azure Stack.

Azure Stack Review and Install

Being familiar with Microsoft Azure public cloud having used it for a few years now, I wanted to gain some closer insight, experience, expand my trade craft on Azure Stack by installing TP3. This is similar to what I have done in the past with OpenStack, Hadoop, Ceph, VMware, Hyper-V and many others, some of which I need to get around to writing about sometime. As a refresher from part one of this series, the following is an image via Microsoft showing the Azure Stack TP3 architecture, click here or on the image to learn more including the names and functions of the various virtual machines (VMs) that make up Azure Stack.

Microsoft Azure Stack architecture
Click here or on the above image to view list of VMs and other services (Image via Microsoft.com)

Whats Involved Installing Azure Stack TP3?

The basic steps are as follows:

  • Read this Azure Stack blog post (Azure Stack)
  • Download the bits (e.g. the Azure Stack software) from here, where you access the Azure Stack Downloader tool.
  • Planning your deployment making decisions on Active Directory and other items.
  • Prepare the target server (physical machine aka PM, or virtual machine VM) that will be the Azure Stack destination.
  • Copy Azure Stack software and installer to target server and run pre-install scripts.
  • Modify PowerShell script file if using a VM instead of a PM
  • Run the Azure Stack CloudBuilder setup, configure unattend.xml if needed or answer prompts.
  • Server reboots, select Azure Stack from two boot options.
  • Prepare your Azure Stack base system (time, network NICs in static or DHCP, if running on VMware install VMtools)
  • Determine if you will be running with Azure Active Directory (AAD) or standalone Active Directory Federated Services (ADFS).
  • Update any applicable installation scripts (see notes that follow)
  • Deploy the script, then extended Azure Stack TP3 PoC as needed

Note that this is a large download of about 16GB (23GB with optional WIndows Server 2016 demo ISO).

Use the AzureStackDownloader tool to download the bits (about 16GB or 23GB with optional Windows Server 2016 base image) which will either be in several separate files which you stitch back together with the MicrosoftAzureStackPOC tool, or as a large VHDX file and smaller 6.8GB ISO (Windows Server 2016). Prepare your target server system for installation once you have all the software pieces downloaded (or do the preparations while waiting for download).

Once you have the software downloaded, if it is a series of eight .bin files (7 about 2GB, 1 around 1.5GB), good idea to verify their checksums, then stitch them together on your target system, or on a staging storage device or file share. Note that for the actual deployment first phase, the large resulting cloudbuilder.vhdx file will need to reside in the C:\ root location of the server where you are installing Azure Stack.

server storageio nested azure stack tp3 vmware

Azure Stack deployment prerequisites (Microsoft) include:

  • At least 12 cores (or more), dual socket processor if possible
  • As much DRAM as possible (I used 100GB)
  • Put the operating system disk on flash SSD (SAS, SATA, NVMe) if possible, allocate at least 200GB (more is better)
  • Four x 140GB or larger (I went with 250GB) drives (HDD or SSD) for data deployment drives
  • A single NIC or adapter (I put mine into static instead of DHCP mode)
  • Verify your physical or virtual server BIOS has VT enabled

The above image helps to set the story of what is being done. On the left is for bare metal (BM) or physical machine (PM) install of Azure Stack TP3, on the right, a nested VMware (vSphere ESXi 6.5) with virtual machine (VM) 11 approach. Note that you could also do a Hyper-V nested among other approaches. Shown in the image above common to both a BM or VM is a staging area (could be space on your system drive) where Azure Stack download occurs. If you use a separate staging area, then simply copy the individual .bin files and stitch together into the larger .VHDX, or, copy the larger .VHDX, which is better is up to your preferences.

Note that if you use the nested approach, there are a couple of configuration (PowerShell) scripts that need to be updated. These changes are to trick the installer into thinking that it is on a PM when it checks to see if on physical or virtual environments.

Also note that if using nested, make sure you have your VMware vSphere ESXi host along with specific VM properly configured (e.g. that virtualization and other features are presented to the VM). With vSphere ESXi 6.5 virtual machine type 11 nesting is night and day easier vs. earlier generations.

Something else to explain here is that you will initially start the Azure Stack install preparation using a standard Windows Server (I used a 2016 version) where the .VHDX is copied into its C:\ root. From there you will execute some PowerShell scripts to setup some configuration files, one of which needs to be modified for nesting.

Once those prep steps are done, there is a Cloudbuilder deploy script that gets run that can be done with an unattend.xml file or manual input. This step will cause a dual-boot option to be added to your server where you can select Azure Stack or your base prep Windows Server instance, followed by reboot.

After the reboot occurs and you choose to boot into Azure Stack, this is the server instance that will actually run the deployment script, as well as build and launch all the VMs for the Azure Stack TP3 PoC. This is where I recommend having a rough sketch like above to annotate layers as you go to remember what layer working at. Don’t worry, it becomes much easier once all is said and done.

Speaking of preparing your server, refer to Microsoft specs, however in general give the server as much RAM and cores as possible. Also if possible place the system disk on a flash SSD (SAS, SATA, NVMe) and make sure that it has at least 200GB, however 250 or even 300GB is better (just in case you need more space).

Additional configuration tips include allocating four data disks for Azure, if possible make these SSDs as well as, however more important IMHO to have at least the system on fast flash SSD. Another tip is to enable only one network card or NIC and put it into static vs. DHCP address mode to make things easier later.

Tip: If running nested, vSphere 6.5 worked the smoothest as had various issues or inconsistencies with earlier VMware versions, even with VMs that ran nested just fine.

Tip: Why run nested? Simple, I wanted to be able to use using VMware tools, do snapshots to go back in time, plus share the server with some other activities until ready to give Azure Stack TP3 its own PM.

Tip: Do not connect the POC machine to the following subnets (192.168.200.0/24, 192.168.100.0/27, 192.168.101.0/26, 192.168.102.0/24, 192.168.103.0/25, 192.168.104.0/25) as Azure Stack TP3 uses those.

storageio azure stack tp3 vmware configuration

Since I decided to use a nested VM deploying using VMware, there were a few extra steps needed that I have included as tips and notes. Following is view via vSphere client of the ESXi host and VM configuration.

The following image combines a couple of different things including:

A: Showing the contents of C:\Azurestack_Supportfiles directory

B: Modifying the PrepareBootFromVHD.ps1 file if deploying on virtual machine (See tips and notes)

C: Showing contents of staging area including individual .bin files along with large CloudBuilder.vhdx

D: Running the PowerShell script commands to prepare the PrepareBootFromVHD.ps1 and related items

prepariing azure stack tp3 cloudbuilder for nested vmware deployment

From PowerShell (administrator):

# Variables
$Uri = 'https://raw.githubusercontent.com/Azure/Azure stack/master/Deployment/'
$LocalPath = 'c:\AzureStack_SupportFiles'

# Create folder
New-Item $LocalPath -type directory

# Download files
( 'BootMenuNoKVM.ps1', 'PrepareBootFromVHD.ps1', 'Unattend.xml', 'unattend_NoKVM.xml') | foreach { Invoke-WebRequest ($uri + $_) -OutFile ($LocalPath + '\' + $_) }

After you do the above, decide if you will be using an Unattend.xml or manual entry of items for building the Azure Stack deployment server (e.g. a Windows Server). Note that the above PowerShell script created the C:\azurestack_supportfiles folder and downloads the script files for building the cloud image using the previously downloaded Azure Stack CloudBuilder.vhdx (which should be in C:\).

Note and tip is that if you are doing a VMware or virtual machine based deployment of TP3 PoC, you will need to change C:\PrepareBootFromVHD.ps1 in the Azure Stack support files folder. Here is a good resource on what gets changed via Github that shows an edit on or about line 87 of PrepareBootFromVHD.ps1. If you run the PrepareBootFromVHD.ps1 script on a virtual machine you will get an error message, the fix is relatively easy (after I found this post).

Look in PrepareBootFromVHD.ps1 for something like the following around line 87:

if ((get-disk | where {$_.isboot -eq $true}).Model -match 'Virtual Disk')       {      Write-Host "The server is currently already booted from a virtual hard disk, to boot the server from the CloudBuilder.vhdx you will need to run this script on an Operating System that is installed on the physical disk of this server."      Exit      }

You can either remove the "exit" command, or, change the test for "Virtual Disk" to something like "X", for fun I did both (and it worked).

Note that you only have to make the above and another change in a later step if you are deploying Azure Stack TP3 as a virtual machine.

Once you are ready, go ahead and launch the PrepareBootFromVHD.ps1 script which will set the BCDBoot entry (more info here).

azure stack tp3 cloudbuilder nested vmware deployment

You will see a reboot and install, this is installing what will be called the physical instance. Note that this is really being installed on the VM system drive as a secondary boot option (e.g. azure stack).

azure stack tp3 dual boot option

After the reboot, login to the new Azure Stack base system and complete any configuration including adding VMware Tools if using VMware nested. Some other things to do include make sure you have your single network adapter set to static (makes things easier), and any other updates or customizations. Before you run the next steps, you need to decide if going to use Azure Active Directory (AAD) or local ADFS.

Note that if you are not running on a virtual machine, simply open a PowerShell (administrator) session, and run the deploy script. Refer to here for more guidance on the various options available including discussion on using AAD or ADFS.

Note if you run the deployment script on a virtual machine, you will get an error which is addressed in the next section, otherwise, sit back and watch the progress..

CloudBuilder Deployment Time

Once you have your Azure Stack deployment system and environment ready, including a snapshot if on virtual machine, launch the PowerShell deployment script. Note that you will need to have decided if deploying with Azure Active Directory (AAD) or Azure Directory Federated Services (ADFS) for standalone aka submarine mode. There are also other options you can select as part of the deployment discussed in the Azure Stack tips here (a must read) and here. I chose to do a submarine mode (e.g. not connected to Public Azure and AAD) deployment.

From PowerShell (administrator):

cd C:\CloudDeployment:\Setup
$adminpass = ConvertTo-SecureString "youradminpass" -AsPlainText -Force
.\InstallAzureStackPOC.ps1 -AdminPassword $adminpass -UseADFS

Deploying on VMware Virtual Machines Tips

Here is a good tip via Gareth Jones (@garethjones294) that I found useful for updating one of the deployment script files (BareMetal_Tests.ps1 located in C:\CloudDeployment\Roles\PhysicalMachines\Tests folder) so that it would skip the bare metal (PM) vs. VM tests. Another good resource, even though it is for TP2 and early versions of VMware is TP2 deployment experiences by Niklas Akerlund (@vNiklas).

Note that this is a bit of a chick and egg scenario unless you are proficient at digging into script files since the BareMetal_Tests.ps1 file does not get unpacked until you run the CloudBuilder deployment script. If you run the script and get an error, then make the changes below, and rerun the script as noted. Once you make the modification to the BareMetal_Tests.ps1 file, keep a copy in a safe place for future use.

Here are some more tips for deploying Azure Stack on VMware,

Per the tip mentioned about via Gareth Jones (tip: read Gareths post vs. simply cut and paste the following which is more of a guide):

Open BareMetal_Tests.ps1 file in PowerShell ISE and navigate to line 376 (or in that area)
Change $false to $true which will stop the script failing when checking to see if the Azure Stack is running inside a VM.
Next go to line 453.
Change the last part of the line to read “Should Not BeLessThan 0”
This will stop the script checking for the required amount of cores available.

After you make the above correction as with any error (and fix) during Azure Stack TP3 PoC deployment, simply run the following.

cd C:\CloudDeployment\Setup
.\InstallAzureStackPOC.ps1 -rerun

Refer to the extra links in the where to learn more section below that offer various tips, tricks and insight that I found useful, particular for deploying on VMware aka nested. Also in the links below are tips on general Azure Stack, TP2, TP3, adding services among other insight.

starting azure stack tp3 deployment

Tip: If you are deploying Azure Stack TP3 PoC on virtual machine, once you start the script above, copy the modified BareMetal_Tests.ps1 file

Once the CloudBuilder deployment starts, sit back and wait, if you are using SSDs, it will take a while, if using HDDs, it will take a long while (up to hours), however check in on it now and then to see progress of if any errors. Note that some of the common errors will occur very early in the deployment such as the BareMetal_Tests.ps1 mentioned above.

azure stack tp3 deployment finished

Checking in periodically to see how the deployment progress is progressing, as well as what is occurring. If you have the time, watch some of the scripts as you can see some interesting things such as the software defined data center (SDDC) aka software-defined data infrastructure (SDDC) aka Azure Stack virtual environment created. This includes virtual machine creation and population, creating the software defined storage using storage spaces direct (S2D), virtual network and active directory along with domain controllers among others activity.

azure stack tp3 deployment progress

After Azure Stack Deployment Completes

After you see the deployment completed, you can try accessing the management portal, however there may be some background processing still running. Here is a good tip post on connecting to Azure Stack from Microsoft using Remote Desktop (RDP) access. Use RDP from the Azure Stack deployment Windows Server and connect to a virtual machine named MAS-CON01, launch Server Manager and for Local Server disable Internet Explorer Enhanced Security (make sure you are on the right system, see the tip mentioned above). Disconnect from MAS-CON01 (refer to the Azure Stack architecture image above), then reconnect, and launch Internet Explorer with an URL of (note documentation side to use which did not work for me).

Note the username for the Azure Stack system is AzureStack\AzureStackAdmin with a password of what you set for administrative during setup. If you get an error, verify the URLs, check your network connectivity, wait a few minutes as well as verify what server you are trying to connect from and too. Keep in mind that even if deploying on a PM or BM (e.g. non virtual server or VM), the Azure Stack deployment TP3 PoC creates a "virtual" software-defined environment with servers, storage (Azure Stack uses Storage Spaces Direct [S2D] and software defined network.

accessing azure stack tp3 management portal dashboard

Once able to connect to Azure Stack, you can add new services including virtual machine image instances such as Windows (use the Server 2016 ISO that is part of Azure Stack downloads), Linux or others. You can also go to these Microsoft resources for some first learning scenarios, using the management portals, configuring PowerShell and troubleshooting.

Where to learn more

The following provide more information and insight about Azure, Azure Stack, Microsoft and Windows among related topics.

  • Azure Stack Technical Preview 3 (TP3) Overview Preview Review
  • Azure Stack TP3 Overview Preview Review Part II
  • Azure Stack Technical Preview (get the bits aka software download here)
  • Azure Stack deployment prerequisites (Microsoft)
  • Microsoft Azure Stack troubleshooting (Microsoft Docs)
  • Azure Stack TP3 refresh tips (Azure Stack)
  • Here is a good post with a tip about not applying certain Windows updates to AzureStack TP3 installs.
  • Configure Azure Stack TP3 to be available on your own network (Azure Stack)
  • Azure Stack TP3 Marketplace syndication (Azure Stack)
  • Azure Stack TP3 deployment experiences (Azure Stack)
  • Frequently asked questions for Azure Stack (Microsoft)
  • Azure Active Directory (AAD) and Active Directory Federation Services (ADFS)
  • Deploy Azure Stack (Microsoft)
  • Connect to Azure Stack (Microsoft)
  • Azure Stack TP2 deployment experiences by Niklas Akerlund (@vNiklas) useful for tips for TP3
  • Deployment Checker for Azure Stack Technical Preview (Microsoft Technet)
  • Azure stack and other tools (Github)
  • How to enable nested virtualization on Hyper-V Windows Server 2016
  • Dell EMC announce Microsoft Hybrid Cloud Azure Stack (Dell EMC)
  • Dell EMC Cloud for Microsoft Azure Stack (Dell EMC)
  • Dell EMC Cloud for Microsoft Azure Stack Data Sheet (Dell EMC PDF)
  • Dell EMC Cloud Chats (Dell EMC Blog)
  • Microsoft Azure stack forum
  • Dell EMC Microsoft Azure Stack solution
  • Gaining Server Storage I/O Insight into Microsoft Windows Server 2016
  • Overview Review of Microsoft ReFS (Reliable File System) and resource links
  • Via WServerNews.com Cloud (Microsoft Azure) storage considerations
  • Via CloudComputingAdmin.com Cloud Storage Decision Making: Using Microsoft Azure for cloud storage
  • www.thenvmeplace.com, www.thessdplace.com, www.objectstoragecenter.com and www.storageio.com/converge
  • What this all means

    A common question is if there is demand for private and hybrid cloud, in fact, some industry expert pundits have even said private, or hybrid are dead which is interesting, how can something be dead if it is just getting started. Likewise, it is early to tell if Azure Stack will gain traction with various organizations, some of whom may have tried or struggled with OpenStack among others.

    Given a large number of Microsoft Windows-based servers on VMware, OpenStack, Public cloud services as well as other platforms, along with continued growing popularity of Azure, having a solution such as Azure Stack provides an attractive option for many environments. That leads to the question of if Azure Stack is essentially a replacement for Windows Servers or Hyper-V and if only for Windows guest operating systems. At this point indeed, Windows would be an attractive and comfortable option, however, given a large number of Linux-based guests running on Hyper-V as well as Azure Public, those are also primary candidates as are containers and other services.

    software defined data infrastructures SDDI and SDDC

    Some will say that if OpenStack is struggling in many organizations and being free open source, how Microsoft can have success with Azure Stack. The answer could be that some organizations have struggled with OpenStack while others have not due to lack of commercial services and turnkey support. Having installed both OpenStack and Azure Stack (as well as VMware among others), Azure Stack is at least the TP3 PoC is easy to install, granted it is limited to one node, unlike the production versions. Likewise, there are easy to use appliance versions of OpenStack that are limited in scale, as well as more involved installs that unlock full functionality.

    OpenStack, Azure Stack, VMware and others have their places, alongside, or supporting containers along with other tools. In some cases, those technologies may exist in the same environment supporting different workloads, as well as accessing various public clouds, after all, Hybrid is the home run for many if not most legality IT environments.

    Ok, nuff said (for now…).

    Cheers
    Gs

    Greg Schulz – Microsoft MVP Cloud and Data Center Management, VMware vExpert (and vSAN). Author Cloud and Virtual Data Storage Networking (CRC Press), The Green and Virtual Data Center (CRC Press), Resilient Storage Networks (Elsevier) and twitter @storageio. Watch for the spring 2017 release of his new book "Software-Defined Data Infrastructure Essentials" (CRC Press).

    Courteous comments are welcome for consideration. First published on https://storageioblog.com any reproduction in whole, in part, with changes to content, without source attribution under title or without permission is forbidden.

    All Comments, (C) and (TM) belong to their owners/posters, Other content (C) Copyright 2006-2023 Server StorageIO(R) and UnlimitedIO. All Rights Reserved.

    Seagate 1200 12Gbs Enterprise SAS SSD StorgeIO lab review

    Seagate 1200 12Gbs Enterprise SAS SSD StorgeIO lab review

    This is the first post of a two part series, read the second post here.

    Earlier this year I had the opportunity to test drive some Seagate 1200 12Gbs Enterprise SAS SSD’s as a follow-up to some earlier activity trying their Enterprise TurboBoost Drives. Disclosure: Seagate has been a StorageIO client and was also the sponsor of this white paper and associated proof-points mentioned in this post.

    The question to ask yourself is not if flash Solid State Device (SSD) technologies are in your future, Instead the questions are when, where, using what, how to configure and related themes. SSD including traditional DRAM and NAND flash-based technologies are like real estate where location matters; however, there are different types of properties to meet various needs. This means leveraging different types of NAND flash SSD technologies in different locations in a complementary and cooperative aka hybrid way. For example nand flash SSD as part of an enterprise tiered storage strategy can be implemented server-side using PCIe cards, SAS and SATA drives as targets or as cache along with software, as well as leveraging SSD devices in storage systems or appliances.

    Seagate 1200 SSD
    Seagate 1200 Enterprise SAS 12Gbs SSD Image via Seagate.com

    Another place where nand flash can be found and compliments SSD devices are so-called Solid State Hybrid Drives (SSHD) or Hybrid Hard Disk Drives (HHDD) including a new generation that accelerate writes as well as reads such as those Seagate refers to as with Enterprise TurboBoost. The Enterprise TurboBoost drives (view the companion StorageIO Lab review TurboBoost white paper here) were previously known as the Solid State Hybrid Drives (SSHD) or Hybrid Hard Disk Drives (HHDD). Read more about TurboBoost here and here.

    The best server and storage I/O is the one you do not have to do

    Keep in mind that the best server or storage I/O is that one that you do not have to do, with the second best being the one with the least overhead resolved as close to the processor (compute) as possible or practical. The following figure shows that the best place to resolve server and storage I/O is as close to the compute processor as possible however only a finite amount of storage memory located there. This is where the server memory and storage I/O hierarchy comes into play which is also often thought of in the context of tiered storage balancing performance and availability with cost and architectural limits.

    Also shown is locality of reference which refers to how close data is to where it is being used and includes cache effectiveness or buffering. Hence a small amount of cache of flash and DRAM in the right location can have a large benefit. Now if you can afford it, install as much DRAM along with flash storage as possible, however if you are like most organizations with finite budgets yet server and storage I/O challenges, then deploy a tiered flash storage strategy.

    flash cache locality of reference
    Server memory storage I/O hierarchy, locality of reference

    Seagate 1200 12Gbs Enterprise SAS SSD’s

    Back to the Seagate 1200 12Gbs Enterprise SAS SSD which is covered in this StorageIO Industry Trends Perspective thought leadership white paper. The focus of the white paper is to look at how the Seagate 1200 Enterprise class SSD’s and 12Gbps SAS address current and next generation tiered storage for virtual, cloud, traditional Little and Big Data infrastructure environments.

    Seagate 1200 Enteprise SSD

    This includes providing proof points running various workloads including Database TPC-B, TPC-E and Microsoft Exchange in the StorageIO Labs along with cache software comparing SSD, SSHD and different HDD’s including 12Gbs SAS 6TB near-line high-capacity drives.

    Seagate 1200 Enterprise SSD Proof Points

    The proof points in this white paper are from an applications focus perspective representing more of an end-to-end real-world situation. While they are not included in this white paper, StorageIO has run traditional storage building-block focus workloads, which can be found at StorageIOblog (Part II: How many IOPS can a HDD, HHDD or SSD do with VMware?). These include tools such as Iometer, iorate, vdbench among others for various IO sizes, mixed, random, sequential, reads, writes along with “hot-band" across different number of threads (concurrent users). “Hot-Band” is part of the SNIA Emerald energy effectiveness metrics for looking at sustained storage performance using tools such as vdbench. Read more about other various server and storage I/O benchmarking tools and techniques here.

    For the following series of proof-points (TPC-B, TPC-E and Exchange) a system under test (SUT) consisted of a physical server (described with the proof-points) configured with VMware ESXi along with guests virtual machines (VMs) configured to do the storage I/O workload. Other servers were used in the case of TPC workloads as application transactional requester to drive the SQL Server database and resulting server storage I/O workload. VMware was used in the proof-points to reflect a common industry trend of using virtual server infrastructures (VSI) supporting applications including database, email among others. For the proof-point scenarios, the SUT along with storage system device under test were dedicated to that scenario (e.g. no other workload running) unless otherwise noted.

    Server Storage I/O config
    Server Storage I/O configuration for proof-points

    Microsoft Exchange Email proof-point configuration

    For this proof-point, Microsoft Jet Stress Exchange performance workloads were placed (e.g. Exchange Database – EDB file) on each of the different devices under test with various metrics shown including activity rates and response time for reads as well as writes. For the Exchange testing, the EDB was placed on the device being tested while its log files were placed on a separate Seagate 400GB Enterprise 12Gbps SAS SSD.

    Test configuration: Seagate 400GB 12000 2.5” SSD (ST400FM0073) 12Gbps SAS, 600GB 2.5” Enterprise 15K with TurboBoost™ (ST600MX) 6 Gbps SAS, 600GB 2.5” Enterprise Enhanced 15K V4 (15K RPM) HDD (ST600MP) with 6 Gbps SAS, Seagate Enterprise Capacity Nearline (ST6000NM0014) 6TB 3.5” 7.2K RPM HDD 12 Gbps SAS and 3TB 7.2K SATA HDD. Email server hosted as guest on VMware vSphere/ESXi V5.5, Microsoft SBS2011 Service Pack 1 64 bit. Guest VM (VMware vSphere 5.5) was on a SSD based dat, had a physical machine (host), with 14 GB DRAM, quad CPU (4 x 3.192GHz) Intel E3-1225 v300, with LSI 9300 series 12Gbps SAS adapters in a PCIe Gen 3 slot with Jet Stress 2010.  All devices being tested were Raw Device Mapped (RDM) where EDB resided. VM on a SSD based separate data store than devices being tested. Log file IOPs were handled via a separate SSD device also persistent (no delayed writes). EDB was 300GB and workload ran for 8 hours.

    Microsoft Exchange VMware SSD performance
    Microsoft Exchange proof-points comparing various storage devices

    TPC-B (Database, Data Warehouse, Batch updates) proof-point configuration

    SSD’s are a good fit for both transaction database activity with reads and write as well as query-based decision support systems (DSS), data warehouse and big data analytics. The following are proof points of SSD capabilities for database activity. In addition to supporting database table files and objects, along with transaction journal logs, other uses include for meta-data, import/export or other high-IO and write intensive scenarios. Two database workload profiles were tested including batch update (write-intensive) and transactional. Activity involved running Transaction Performance Council (TPC) workloads TPC-B (batch update) and TPC-E (transaction/OLTP simulate financial trading system) against Microsoft SQL Server 2012 databases. Each test simulation had the SQL Server database (MDF) on a different device with transaction log file (LDF) on a separate SSD. TPC-B for a single device results shown below.

    TPC-B (write intensive) results below show how TPS work being done (blue) increases from left to right (more is better) for various numbers of simulated users. Also shown on the same line for each amount of TPS work being done is the average latency in seconds (right to left) where lower is better. Results are shown from top to bottom for each group of users (100, 50, 20 and 1) for the different drives being tested (top to bottom). Note how the SSD device does more work at a lower response time vs. traditional HDD’s

    Test configuration: Seagate 400GB 12000 2.5” SSD (ST400FM0073) 12Gbps SAS, 600GB 2.5” Enterprise 15K with TurboBoost™ (ST600MX) 6 Gbps SAS, 600GB 2.5” Enterprise Enhanced 15K V4 (15K RPM) HDD (ST600MP) with 6 Gbps SAS, Seagate Enterprise Capacity Nearline (ST6000NM0014) 6TB 3.5” 7.2K RPM HDD 12 Gbps SAS and 3TB Seagate 7.2K SATA HDD Workload generator and virtual clients Windows 7 Ultimate 64 bit. Microsoft SQL Server 2012 database was on Windows 7 guest. Guest VM (VMware vSphere 5.5) had a dedicated 14 GB DRAM, quad CPU (4 x 3.192GHz) Intel E3-1225 v300, with LSI 9300 series 12Gbps SAS adapters in a PCIe Gen 3 slot along with TPC-B (www.tpc.org) workloads.

    VM with guest OS along with SQL tempdb and masterdb resided on separate SSD based data store from devices being tested (e.g., where MDF (main database tables) and LDF (log file) resided). All devices being tested were Raw Device Mapped (RDM) independent persistent with database log file on a separate SSD device also persistent (no delayed writes) using VMware PVSCSI driver. MDF and LDF file sizes were 142GB and 26GB with scale factor of 10000, with each step running for one hour (10-minute preamble). Note that these proof-points DO NOT use VMware or any other third-party cache software or I/O acceleration tool technologies as those are covered later in a separate proof-point.

    TPC-B sql server database SSD performance
    TPC-B SQL Server database proof-points comparing various storage devices

    TPC-E (Database, Financial Trading) proof-point configuration

    The following shows results from TPC-E test (OLTP/transactional workload) simulating a financial trading system. TPC-E is an industry standard workload that performs a mix of reads and writes database queries. Proof-points were performed with various numbers of users from 10, 20, 50 and 100 to determine (TPS) Transaction per Second (aka I/O rate) and response time in seconds. The TPC-E transactional results are shown for each device being tested across different user workloads. The results show how TPC-E TPS work (blue) increases from left to right (more is better) for larger numbers of users along with corresponding latency (green) that goes from right to left (less is better). The Seagate Enterprise 1200 SSD is shown on the top in the figure below with a red box around its results. Note how the SSD as a lower latency while doing more work compared to the other traditional HDD’s

    Test configuration: Seagate 400GB 12000 2.5” SSD (ST400FM0073) 12Gbps SAS, 600GB 2.5” Enterprise 15K with TurboBoost™ (ST600MX) 6 Gbps SAS, 600GB 2.5” Enterprise Enhanced 15K V4 (15K RPM) HDD (ST600MP) with 6 Gbps SAS, Seagate Enterprise Capacity Nearline (ST6000NM0014) 6TB 3.5” 7.2K RPM HDD 12 Gbps SAS and 3TB Seagate 7.2K SATA HDD Workload generator and virtual clients Windows 7 Ultimate 64 bit. Microsoft SQL Server 2012 database was on Windows 7 guest. Guest VM (VMware vSphere 5.5) had a dedicated 14 GB DRAM, quad CPU (4 x 3.192GHz) Intel E3-1225 v300, with LSI 9300 series 12Gbps SAS adapters in a PCIe Gen 3 slot along with TPC-B (www.tpc.org) workloads.

    VM with guest OS along with SQL tempdb and masterdb resided on separate SSD based data store from devices being tested (e.g., where MDF (main database tables) and LDF (log file) resided). All devices being tested were Raw Device Mapped (RDM) independent persistent with database log file on a separate SSD device also persistent (no delayed writes) using VMware PVSCSI driver. MDF and LDF file sizes were 142GB and 26GB with scale factor of 10000, with each step running for one hour (10-minute preamble). Note that these proof-points DO NOT use VMware or any other third-party cache software or I/O acceleration tool technologies as those are covered later in a separate proof-point.

    TPC-E sql server database SSD performance
    TPC-E (Financial trading) SQL Server database proof-points comparing various storage devices

    Continue reading part-two of this two-part series here including the virtual server storage I/O blender effect and solution.

    Ok, nuff said (for now).

    Cheers gs

    Greg Schulz – Author Cloud and Virtual Data Storage Networking (CRC Press), The Green and Virtual Data Center (CRC Press) and Resilient Storage Networks (Elsevier)
    twitter @storageio

    All Comments, (C) and (TM) belong to their owners/posters, Other content (C) Copyright 2006-2024 Server StorageIO and UnlimitedIO LLC All Rights Reserved