
Server storage I/O Intel NUC nick knack notes – Second impressions
This is the second of a two-part series about my first and second impressions of the Intel NUC (Next Unit Computing). In the first post (here) I give an overview and my first impressions while in this post lets look at options added to my NUC model 54250, first deployment use and more impressions.
Intel® NUC with Intel® Core™ i5 Processor and 2.5-Inch Drive Support (NUC5i5RYH) via Intel.com
What you will want to add to a NUC
Since the NUC is a basic brick with a processor mounted on its mother board, you will need to add memory, some type of persistent storage device (mSATA, SATA or USB based) and optionally a WiFi card.
One of the nice things about the NUC is that in many ways it is the equivalent functionality of a laptop or mini-tower without the extra overhead (cost, components, packaging) enabling you to customize as needed for your specific requirements. For example there is no keyboard, mouse, video screen, WiFi, Hard Disk Drive (HDD) or flash Solid State Device (SSD) included with an operating system pre-installed. There is no least memory required enabling you to decide how much to configure while using compatible laptop style memory. Video and monitors attach via HDMI or mini-port including VGA devices via an adapter cable. Keyboard and mouse if needed are handled via USB ports.
Here is what I added to my NUC model 5420.
Note that you will also need to supply some type of Keyboard Video Mouse (KVM), in my case I used a HDMI to VGA adapter cable to attach the NUC via HDMI (for video) and USB (keyboard and mouse) to my Startech KVM switch.
Following images show on the left Intel WiFi card installed and on the right, a Samsung 840 EVO mSATA 500GB flash SSD installed above the WiFi card. Also notice on the far right of the images the two DDR3 "notebook" class DRAM DIMM slots.


Left: Intel WiFi card installed and Right Samsung EVO mSATA SSD card (sits above WiFi card)
Note that the NUC (as do many laptops) accepts 9mm or smaller thin 7mm height HDDs and SSDs in its SATA drive bay. I mention this because some of the higher-capacity 2TB 2.5" SFF drives are taller than 9m as shown in the above image and do not fit in the NUC internal SATA drive bay. While many devices and systems support 2.5" drive slots for HDD, SSD or HHDD/SSHDs, pay attention to the height and avoid surprises when something does not fit like it was assumed to.

Low-profile and tall-profile 2.5" SFF HDDs
Additional drives and devices can be attached using external USB 3.0 ports including HDDs, SSDs or even USB to GbE adapters if needed. You will need to supply your own operating system, hypervisor, storage, networking or other software, such as Windows, *nix, VMware ESXi, Hyper-V, KVM, Xen, OpenStack or any of the various ZFS based (among others) storage appliances.
Unpacking and physical NUC installation
Initial setup and physical configuration of the NUC is pretty quick with the only tool needed being a Philips screw driver.
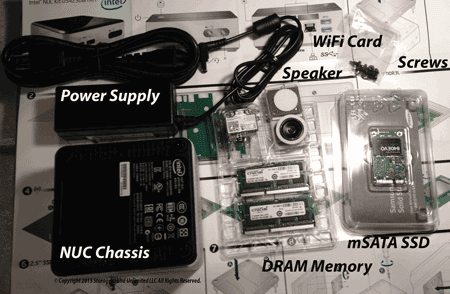
Intel NUC 5420 and components ready for installation
With all the components including the NUC itself laid out for a quick inventory including recording serial numbers (see image above), the next step is to open up the NUC by removing four Philip screws from the bottom. Once the screws are removed and bottom plate removed, the SATA drive bay opens up to reach the slots of memory, mSATA SSD and WiFi card (see images below). Once the memory, mSATA and WiFi cards are installed, the SATA drive bay coverage those components and it is time to install a 2.5" standard height HDD or SSD. For my first deployment I installed temporarily installed on of my older HHDDs a 750GB Seagate Momentus XT that will be replaced by something newer soon.


View of NUC with bottom cover removed, Left empty SATA drive bay, Right HDD installed
After the components are installed, it is time to replace the bottom cover plate of the NUC securing in place with the four screws previously removed. Next up is attaching any external devices via USB and other ports including KVM and LAN network connection. Once the hardware is ready, its time to power up the NUC and checkout the Visual BIOS (or UEFI) as shown below.


NUC VisualBIOS screen shot examples
At this point unless you have already installed an operating system, hypervisor or other software on a HDD, SSD or USB device, it is time to install your prefered software.
Windows 7
First up was Windows 7 as I already had an image built on the HHDD that required some drivers to be added. specifically, a visit to the Intel resources site (See NUC resources and links section later in this post) was made to get a LAN GbE, WiFi and USB drivers. Once those were installed the on-board GbE LAN port worked good as did the WiFi. Another driver that needed to be download was for a USB-GbE adapter to add another LAN connection. Also a couple of reboots were required for other Windows drivers and configuration changes to take place to correct some transient problems including KVM hangs which eventually cleared themselves up.
Windows 2012 R2
Following Windows 7, next up was a clean install of Windows 2012 R2 which also required some drivers and configuration changes. One of the challenges is that Windows 2012 R2 is not officially supported on the NUC with its GbE LAN and WiFi cards. However after doing some searches and reading a few posts including this and this, a solution was found and Windows 2012 R2 and its networking are working good.
Ubuntu and Clonezilla
Next up was a quick install of Ubuntu 14.04 which went pretty smooth, as well as using Clonezilla to do some drive maintenance, move images and partitions among other things.
VMware ESXi 5.5U2
My first attempt at installing a standard VMware ESXi 5.5U2 image ran into problems due to the GbE LAN port not being seen. The solution is to use a different build, or custom ISO that includes the applicable GbE LAN driver (e.g. net-e1000e-2.3.2.x86_64.vib) and some useful information at Florian Grehl site (@virten) and over at Andreas Peetz site (@VFrontDe) including SATA controller driver for xahci. Once the GbE driver was added (same driver that addresses other Intel NIC I217/I218 based systems) along with updating the SATA driver, VMware worked fine.
Needless to say there are many other things I plan on doing with the NUC both as a standalone bare-metal system as well as a virtual platform as I get more time and projects allow.
What about building your NUC alternative?
In addition to the NUC models available via Intel and its partners and accessorizing as needed, there are also special customized and ruggedized NUC versions similar to what you would expect to find with laptop, notebooks, and other PC based systems.


Left MSI ProBox rear-view Right MSI ProBox front view
If you are looking to do more than what Intel and its partners offer, then there are some other options such as to increase the number of external ports among other capabilities. One option which I recently added to my collection of systems is an DIY (Do It Yourself) MSI ProBox (VESA mountable) such as this one here.

Internal view MSI ProBox (no memory, processor or disks)
With the MSI ProBox, they are essentially a motherboard with an empty single cpu socket (e.g. LGA 1150 up to 65W) for supporting various processors, two empty DDR3 DIMM slots, 2 empty 2.5" SATA ports among other capabilities. Enclosures such as the MSI ProBox give you flexibility creating something more robust beyond a basic NUC yet smaller than a traditional server depending on your specific needs.
Looking for other small form factor modular and ruggedized server options as an alternative to a NUC, than check out those from Xi3, Advantech, Cadian Networks, and Logic Supply among many others.
First NUC impressions
Overall I like the NUC and see many uses for it from consumer, home including entertainment and media systems, video security surveillance as well as a small server or workstation device. In addition, I can see a NUC being used for smaller environments as desktop workstations or as a lower-power, lower performance system including as a small virtualization host for SOHO, small SMB and ROBO environments. Another usage is for home virtual lab as well as gaming among other scenarios including simple software defined storage proof of concepts. For example, how about creating a small cluster of NUCs to run VMware VSAN, or Datacore, EMC ScaleIO, Starwind, Microsoft SOFS or Hyper-V as well as any of the many ZFS based NAS storage software applications.
Pro’s – Features and benefits
Small, low-power, self-contained with flexibility to choose my memory, WiFi, storage (HDD or SSD) without the extra cost of those items or software being included.
Con’s – Caveats or what to look out for
Would be nice to have another GbE LAN port however I addressed that by adding a USB 3.0 to GbE cable, likewise would be nice if the 2.5" SATA drive bay supported tall height form-factor devices such as the 2TB devices. The work around for adding larger capacity and physically larger storage devices is to use the USB 3.0 ports. The biggest warning is if you are going to venture outside of the official supported operating system and application software realm be ready to load some drivers, possibly patch and hack some install scripts and then plug and pray it all works. So far I have not run into any major show stoppers that were not addressed with some time spent searching (google will be your friend), then loading the drivers or making configuration changes.
Additional NUC resources and links
Various Intel products support search page
Intel NUC support and download links
Intel NUC model 54250 page, product brief page (and PDF version), and support with download links
Intel NUC home theater solutions guide (PDF)
Intel HCL for NUC page and Intel Core i5-4250U processor speeds and feeds
VMware on NUC tips
VMware ESXi driver for LAN net-e1000e-2.3.2.x86_64
VMware ESXi SATA xahci driver
Server storage I/O Intel NUC nick knack notes – First impressions
Server Storage I/O Cables Connectors Chargers & other Geek Gifts (Part I and Part II)
Software defined storage on a budget with Lenovo TS140
What this all means
Intel NUC provides a good option for many situations that might otherwise need a larger mini-tower desktop workstations or similar systems both for home, consumer and small office needs. NUC can also be used for specialized pre-configured application specific situations that need low-power, basic system functionality and expansion options in a small physical footprint. In addition NUC can also be a good option for adding to an existing physical and virtual LAB or as a basis for starting a new one.
So far I have found many uses for NUC which free up other systems to do other tasks while enabling some older devices to finally be retired. On the other hand like most any technology, while the NUC is flexible, its low power and performance are not enough to support other applications. However the NUC gives me flexibility to leverage the applicable unit of compute (e.g. server, workstation, etc.) that is applicable to a given task or put another way, use the right technology tool for the task at hand.
For now I only need a single NUC to be a companion to my other HP, Dell and Lenovo servers as well as MSI ProBox, however maybe there will be a small NUC cluster, grid or ring configured down the road.
What say you, do you have a NUC if so, how is it being used and tips, tricks or hints to share with others?
Ok, nuff said for now.
Cheers
Gs
Greg Schulz – Author Cloud and Virtual Data Storage Networking (CRC Press), The Green and Virtual Data Center (CRC Press) and Resilient Storage Networks (Elsevier)
twitter @storageio
All Comments, (C) and (TM) belong to their owners/posters, Other content (C) Copyright 2006-2023 StorageIO and UnlimitedIO LLC All Rights Reserved


