Azure Stack TP3 Overview Preview (Part II) Install Review
This is part two of a two-part series looking at Microsoft Azure Stack with a focus on my experiences installing Microsoft Azure Stack Technical Preview 3 (TP3) including into a nested VMware vSphere ESXi environment. Read part one here that provides a general overview of Azure Stack.
Azure Stack Review and Install
Being familiar with Microsoft Azure public cloud having used it for a few years now, I wanted to gain some closer insight, experience, expand my trade craft on Azure Stack by installing TP3. This is similar to what I have done in the past with OpenStack, Hadoop, Ceph, VMware, Hyper-V and many others, some of which I need to get around to writing about sometime. As a refresher from part one of this series, the following is an image via Microsoft showing the Azure Stack TP3 architecture, click here or on the image to learn more including the names and functions of the various virtual machines (VMs) that make up Azure Stack.
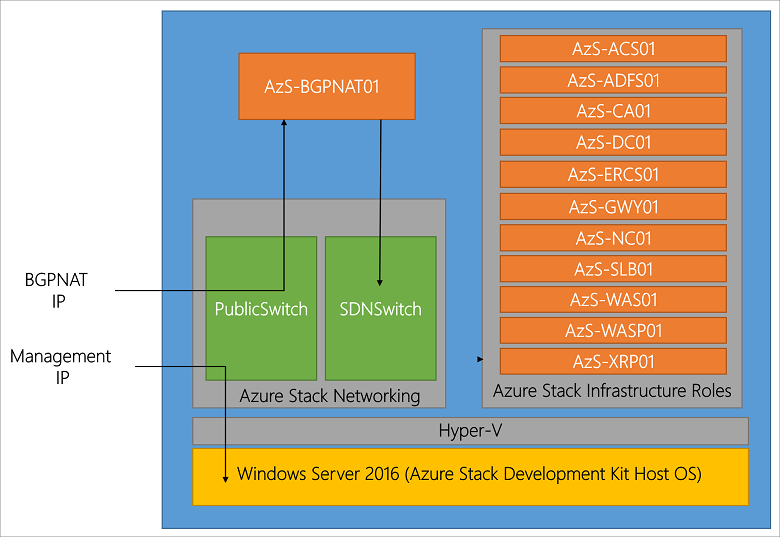
Click here or on the above image to view list of VMs and other services (Image via Microsoft.com)
Whats Involved Installing Azure Stack TP3?
The basic steps are as follows:
- Read this Azure Stack blog post (Azure Stack)
- Download the bits (e.g. the Azure Stack software) from here, where you access the Azure Stack Downloader tool.
- Planning your deployment making decisions on Active Directory and other items.
- Prepare the target server (physical machine aka PM, or virtual machine VM) that will be the Azure Stack destination.
- Copy Azure Stack software and installer to target server and run pre-install scripts.
- Modify PowerShell script file if using a VM instead of a PM
- Run the Azure Stack CloudBuilder setup, configure unattend.xml if needed or answer prompts.
- Server reboots, select Azure Stack from two boot options.
- Prepare your Azure Stack base system (time, network NICs in static or DHCP, if running on VMware install VMtools)
- Determine if you will be running with Azure Active Directory (AAD) or standalone Active Directory Federated Services (ADFS).
- Update any applicable installation scripts (see notes that follow)
- Deploy the script, then extended Azure Stack TP3 PoC as needed
Note that this is a large download of about 16GB (23GB with optional WIndows Server 2016 demo ISO).
Use the AzureStackDownloader tool to download the bits (about 16GB or 23GB with optional Windows Server 2016 base image) which will either be in several separate files which you stitch back together with the MicrosoftAzureStackPOC tool, or as a large VHDX file and smaller 6.8GB ISO (Windows Server 2016). Prepare your target server system for installation once you have all the software pieces downloaded (or do the preparations while waiting for download).
Once you have the software downloaded, if it is a series of eight .bin files (7 about 2GB, 1 around 1.5GB), good idea to verify their checksums, then stitch them together on your target system, or on a staging storage device or file share. Note that for the actual deployment first phase, the large resulting cloudbuilder.vhdx file will need to reside in the C:\ root location of the server where you are installing Azure Stack.

Azure Stack deployment prerequisites (Microsoft) include:
- At least 12 cores (or more), dual socket processor if possible
- As much DRAM as possible (I used 100GB)
- Put the operating system disk on flash SSD (SAS, SATA, NVMe) if possible, allocate at least 200GB (more is better)
- Four x 140GB or larger (I went with 250GB) drives (HDD or SSD) for data deployment drives
- A single NIC or adapter (I put mine into static instead of DHCP mode)
- Verify your physical or virtual server BIOS has VT enabled
The above image helps to set the story of what is being done. On the left is for bare metal (BM) or physical machine (PM) install of Azure Stack TP3, on the right, a nested VMware (vSphere ESXi 6.5) with virtual machine (VM) 11 approach. Note that you could also do a Hyper-V nested among other approaches. Shown in the image above common to both a BM or VM is a staging area (could be space on your system drive) where Azure Stack download occurs. If you use a separate staging area, then simply copy the individual .bin files and stitch together into the larger .VHDX, or, copy the larger .VHDX, which is better is up to your preferences.
Note that if you use the nested approach, there are a couple of configuration (PowerShell) scripts that need to be updated. These changes are to trick the installer into thinking that it is on a PM when it checks to see if on physical or virtual environments.
Also note that if using nested, make sure you have your VMware vSphere ESXi host along with specific VM properly configured (e.g. that virtualization and other features are presented to the VM). With vSphere ESXi 6.5 virtual machine type 11 nesting is night and day easier vs. earlier generations.
Something else to explain here is that you will initially start the Azure Stack install preparation using a standard Windows Server (I used a 2016 version) where the .VHDX is copied into its C:\ root. From there you will execute some PowerShell scripts to setup some configuration files, one of which needs to be modified for nesting.
Once those prep steps are done, there is a Cloudbuilder deploy script that gets run that can be done with an unattend.xml file or manual input. This step will cause a dual-boot option to be added to your server where you can select Azure Stack or your base prep Windows Server instance, followed by reboot.
After the reboot occurs and you choose to boot into Azure Stack, this is the server instance that will actually run the deployment script, as well as build and launch all the VMs for the Azure Stack TP3 PoC. This is where I recommend having a rough sketch like above to annotate layers as you go to remember what layer working at. Don’t worry, it becomes much easier once all is said and done.
Speaking of preparing your server, refer to Microsoft specs, however in general give the server as much RAM and cores as possible. Also if possible place the system disk on a flash SSD (SAS, SATA, NVMe) and make sure that it has at least 200GB, however 250 or even 300GB is better (just in case you need more space).
Additional configuration tips include allocating four data disks for Azure, if possible make these SSDs as well as, however more important IMHO to have at least the system on fast flash SSD. Another tip is to enable only one network card or NIC and put it into static vs. DHCP address mode to make things easier later.
Tip: If running nested, vSphere 6.5 worked the smoothest as had various issues or inconsistencies with earlier VMware versions, even with VMs that ran nested just fine.
Tip: Why run nested? Simple, I wanted to be able to use using VMware tools, do snapshots to go back in time, plus share the server with some other activities until ready to give Azure Stack TP3 its own PM.
Tip: Do not connect the POC machine to the following subnets (192.168.200.0/24, 192.168.100.0/27, 192.168.101.0/26, 192.168.102.0/24, 192.168.103.0/25, 192.168.104.0/25) as Azure Stack TP3 uses those.

Since I decided to use a nested VM deploying using VMware, there were a few extra steps needed that I have included as tips and notes. Following is view via vSphere client of the ESXi host and VM configuration.
The following image combines a couple of different things including:
A: Showing the contents of C:\Azurestack_Supportfiles directory
B: Modifying the PrepareBootFromVHD.ps1 file if deploying on virtual machine (See tips and notes)
C: Showing contents of staging area including individual .bin files along with large CloudBuilder.vhdx
D: Running the PowerShell script commands to prepare the PrepareBootFromVHD.ps1 and related items

From PowerShell (administrator):
# Variables
$Uri = 'https://raw.githubusercontent.com/Azure/Azure stack/master/Deployment/'
$LocalPath = 'c:\AzureStack_SupportFiles'

# Create folder
New-Item $LocalPath -type directory

# Download files
( 'BootMenuNoKVM.ps1', 'PrepareBootFromVHD.ps1', 'Unattend.xml', 'unattend_NoKVM.xml') | foreach { Invoke-WebRequest ($uri + $_) -OutFile ($LocalPath + '\' + $_) }
After you do the above, decide if you will be using an Unattend.xml or manual entry of items for building the Azure Stack deployment server (e.g. a Windows Server). Note that the above PowerShell script created the C:\azurestack_supportfiles folder and downloads the script files for building the cloud image using the previously downloaded Azure Stack CloudBuilder.vhdx (which should be in C:\).
Note and tip is that if you are doing a VMware or virtual machine based deployment of TP3 PoC, you will need to change C:\PrepareBootFromVHD.ps1 in the Azure Stack support files folder. Here is a good resource on what gets changed via Github that shows an edit on or about line 87 of PrepareBootFromVHD.ps1. If you run the PrepareBootFromVHD.ps1 script on a virtual machine you will get an error message, the fix is relatively easy (after I found this post).
Look in PrepareBootFromVHD.ps1 for something like the following around line 87:
if ((get-disk | where {$_.isboot -eq $true}).Model -match 'Virtual Disk') { Write-Host "The server is currently already booted from a virtual hard disk, to boot the server from the CloudBuilder.vhdx you will need to run this script on an Operating System that is installed on the physical disk of this server." Exit }
You can either remove the "exit" command, or, change the test for "Virtual Disk" to something like "X", for fun I did both (and it worked).
Note that you only have to make the above and another change in a later step if you are deploying Azure Stack TP3 as a virtual machine.
Once you are ready, go ahead and launch the PrepareBootFromVHD.ps1 script which will set the BCDBoot entry (more info here).

You will see a reboot and install, this is installing what will be called the physical instance. Note that this is really being installed on the VM system drive as a secondary boot option (e.g. azure stack).

After the reboot, login to the new Azure Stack base system and complete any configuration including adding VMware Tools if using VMware nested. Some other things to do include make sure you have your single network adapter set to static (makes things easier), and any other updates or customizations. Before you run the next steps, you need to decide if going to use Azure Active Directory (AAD) or local ADFS.
Note that if you are not running on a virtual machine, simply open a PowerShell (administrator) session, and run the deploy script. Refer to here for more guidance on the various options available including discussion on using AAD or ADFS.
Note if you run the deployment script on a virtual machine, you will get an error which is addressed in the next section, otherwise, sit back and watch the progress..
CloudBuilder Deployment Time
Once you have your Azure Stack deployment system and environment ready, including a snapshot if on virtual machine, launch the PowerShell deployment script. Note that you will need to have decided if deploying with Azure Active Directory (AAD) or Azure Directory Federated Services (ADFS) for standalone aka submarine mode. There are also other options you can select as part of the deployment discussed in the Azure Stack tips here (a must read) and here. I chose to do a submarine mode (e.g. not connected to Public Azure and AAD) deployment.
From PowerShell (administrator):
cd C:\CloudDeployment:\Setup

$adminpass = ConvertTo-SecureString "youradminpass" -AsPlainText -Force

.\InstallAzureStackPOC.ps1 -AdminPassword $adminpass -UseADFS
Deploying on VMware Virtual Machines Tips
Here is a good tip via Gareth Jones (@garethjones294) that I found useful for updating one of the deployment script files (BareMetal_Tests.ps1 located in C:\CloudDeployment\Roles\PhysicalMachines\Tests folder) so that it would skip the bare metal (PM) vs. VM tests. Another good resource, even though it is for TP2 and early versions of VMware is TP2 deployment experiences by Niklas Akerlund (@vNiklas).
Note that this is a bit of a chick and egg scenario unless you are proficient at digging into script files since the BareMetal_Tests.ps1 file does not get unpacked until you run the CloudBuilder deployment script. If you run the script and get an error, then make the changes below, and rerun the script as noted. Once you make the modification to the BareMetal_Tests.ps1 file, keep a copy in a safe place for future use.
Here are some more tips for deploying Azure Stack on VMware,
Per the tip mentioned about via Gareth Jones (tip: read Gareths post vs. simply cut and paste the following which is more of a guide):
Open BareMetal_Tests.ps1 file in PowerShell ISE and navigate to line 376 (or in that area)
Change $false to $true which will stop the script failing when checking to see if the Azure Stack is running inside a VM.
Next go to line 453.
Change the last part of the line to read “Should Not BeLessThan 0”
This will stop the script checking for the required amount of cores available.
After you make the above correction as with any error (and fix) during Azure Stack TP3 PoC deployment, simply run the following.
cd C:\CloudDeployment\Setup
.\InstallAzureStackPOC.ps1 -rerun
Refer to the extra links in the where to learn more section below that offer various tips, tricks and insight that I found useful, particular for deploying on VMware aka nested. Also in the links below are tips on general Azure Stack, TP2, TP3, adding services among other insight.

Tip: If you are deploying Azure Stack TP3 PoC on virtual machine, once you start the script above, copy the modified BareMetal_Tests.ps1 file
Once the CloudBuilder deployment starts, sit back and wait, if you are using SSDs, it will take a while, if using HDDs, it will take a long while (up to hours), however check in on it now and then to see progress of if any errors. Note that some of the common errors will occur very early in the deployment such as the BareMetal_Tests.ps1 mentioned above.

Checking in periodically to see how the deployment progress is progressing, as well as what is occurring. If you have the time, watch some of the scripts as you can see some interesting things such as the software defined data center (SDDC) aka software-defined data infrastructure (SDDC) aka Azure Stack virtual environment created. This includes virtual machine creation and population, creating the software defined storage using storage spaces direct (S2D), virtual network and active directory along with domain controllers among others activity.

After Azure Stack Deployment Completes
After you see the deployment completed, you can try accessing the management portal, however there may be some background processing still running. Here is a good tip post on connecting to Azure Stack from Microsoft using Remote Desktop (RDP) access. Use RDP from the Azure Stack deployment Windows Server and connect to a virtual machine named MAS-CON01, launch Server Manager and for Local Server disable Internet Explorer Enhanced Security (make sure you are on the right system, see the tip mentioned above). Disconnect from MAS-CON01 (refer to the Azure Stack architecture image above), then reconnect, and launch Internet Explorer with an URL of (note documentation side to use which did not work for me).
Note the username for the Azure Stack system is AzureStack\AzureStackAdmin with a password of what you set for administrative during setup. If you get an error, verify the URLs, check your network connectivity, wait a few minutes as well as verify what server you are trying to connect from and too. Keep in mind that even if deploying on a PM or BM (e.g. non virtual server or VM), the Azure Stack deployment TP3 PoC creates a "virtual" software-defined environment with servers, storage (Azure Stack uses Storage Spaces Direct [S2D] and software defined network.

Once able to connect to Azure Stack, you can add new services including virtual machine image instances such as Windows (use the Server 2016 ISO that is part of Azure Stack downloads), Linux or others. You can also go to these Microsoft resources for some first learning scenarios, using the management portals, configuring PowerShell and troubleshooting.
Where to learn more
The following provide more information and insight about Azure, Azure Stack, Microsoft and Windows among related topics.
Azure Stack Technical Preview 3 (TP3) Overview Preview ReviewAzure Stack TP3 Overview Preview Review Part IIAzure Stack Technical Preview (get the bits aka software download here)Azure Stack deployment prerequisites (Microsoft)Microsoft Azure Stack troubleshooting (Microsoft Docs)Azure Stack TP3 refresh tips (Azure Stack)Here is a good post with a tip about not applying certain Windows updates to AzureStack TP3 installs.Configure Azure Stack TP3 to be available on your own network (Azure Stack)Azure Stack TP3 Marketplace syndication (Azure Stack)Azure Stack TP3 deployment experiences (Azure Stack)Frequently asked questions for Azure Stack (Microsoft) Azure Active Directory (AAD) and Active Directory Federation Services (ADFS)Deploy Azure Stack (Microsoft)Connect to Azure Stack (Microsoft)Azure Stack TP2 deployment experiences by Niklas Akerlund (@vNiklas) useful for tips for TP3Deployment Checker for Azure Stack Technical Preview (Microsoft Technet)Azure stack and other tools (Github)How to enable nested virtualization on Hyper-V Windows Server 2016Dell EMC announce Microsoft Hybrid Cloud Azure Stack (Dell EMC)Dell EMC Cloud for Microsoft Azure Stack (Dell EMC)Dell EMC Cloud for Microsoft Azure Stack Data Sheet (Dell EMC PDF)Dell EMC Cloud Chats (Dell EMC Blog)Microsoft Azure stack forumDell EMC Microsoft Azure Stack solutionGaining Server Storage I/O Insight into Microsoft Windows Server 2016Overview Review of Microsoft ReFS (Reliable File System) and resource linksVia WServerNews.com Cloud (Microsoft Azure) storage considerationsVia CloudComputingAdmin.com Cloud Storage Decision Making: Using Microsoft Azure for cloud storagewww.thenvmeplace.com, www.thessdplace.com, www.objectstoragecenter.com and www.storageio.com/convergeWhat this all means
A common question is if there is demand for private and hybrid cloud, in fact, some industry expert pundits have even said private, or hybrid are dead which is interesting, how can something be dead if it is just getting started. Likewise, it is early to tell if Azure Stack will gain traction with various organizations, some of whom may have tried or struggled with OpenStack among others.
Given a large number of Microsoft Windows-based servers on VMware, OpenStack, Public cloud services as well as other platforms, along with continued growing popularity of Azure, having a solution such as Azure Stack provides an attractive option for many environments. That leads to the question of if Azure Stack is essentially a replacement for Windows Servers or Hyper-V and if only for Windows guest operating systems. At this point indeed, Windows would be an attractive and comfortable option, however, given a large number of Linux-based guests running on Hyper-V as well as Azure Public, those are also primary candidates as are containers and other services.
Some will say that if OpenStack is struggling in many organizations and being free open source, how Microsoft can have success with Azure Stack. The answer could be that some organizations have struggled with OpenStack while others have not due to lack of commercial services and turnkey support. Having installed both OpenStack and Azure Stack (as well as VMware among others), Azure Stack is at least the TP3 PoC is easy to install, granted it is limited to one node, unlike the production versions. Likewise, there are easy to use appliance versions of OpenStack that are limited in scale, as well as more involved installs that unlock full functionality.
OpenStack, Azure Stack, VMware and others have their places, alongside, or supporting containers along with other tools. In some cases, those technologies may exist in the same environment supporting different workloads, as well as accessing various public clouds, after all, Hybrid is the home run for many if not most legality IT environments.
Ok, nuff said (for now…).
Cheers
Gs
Greg Schulz – Microsoft MVP Cloud and Data Center Management, VMware vExpert (and vSAN). Author Cloud and Virtual Data Storage Networking (CRC Press), The Green and Virtual Data Center (CRC Press), Resilient Storage Networks (Elsevier) and twitter @storageio. Watch for the spring 2017 release of his new book "Software-Defined Data Infrastructure Essentials" (CRC Press).
Courteous comments are welcome for consideration. First published on https://storageioblog.com any reproduction in whole, in part, with changes to content, without source attribution under title or without permission is forbidden.
All Comments, (C) and (TM) belong to their owners/posters, Other content (C) Copyright 2006-2023 Server StorageIO(R) and UnlimitedIO. All Rights Reserved.